Google Cloud Platform Installation
Plakar Control Plane is distributed on Google Cloud Platform as a custom image
hosted under the (plakar-images) project. Because the image lives outside your
own project, GCP requires explicit authorization before it can be used, and this
authorization works differently depending on whether you deploy through the
Console or the gcloud CLI.
Getting access to the image
GCP images can only be shared with projects, domains, or individual accounts that the image owner has explicitly authorized. The Console’s instance-creation flow relies on this authorization to browse and select an image, so it only works for accounts Plakar has whitelisted, either by domain or by an email address.
gcloudCLI: works without any whitelisting, because referencing an image by name and project doesn’t require the browsing permissions the Console UI needs. This is the recommended path for most users, since it doesn’t depend on Plakar granting access first.- Console (UI): contact us to have your Google account or
Workspace domain added to the
plakar-imagesproject’s IAM policy. Once whitelisted, the project appears when browsing custom images, and the rest of the deployment can be done by clicking through the Console.
The gcloud CLI can reference the plakar-images project directly, without
requiring the domain-whitelisting the Console needs:
gcloud compute instances create <INSTANCE_NAME> \
  --project=<YOUR_PROJECT> \
  --zone=<ZONE> \
  --machine-type=n2-standard-4 \
  --image=control-plane-v-0-0-3 \
  --image-project=plakar-images \
  --boot-disk-size=10GB \
  --boot-disk-type=pd-balanced \
  --create-disk=name=<INSTANCE_NAME>-data,size=1024GB,type=pd-balanced \
  --tags=http-server \
  --service-account=<SERVICE_ACCOUNT_EMAIL> \
--scopes=cloud-platform-
--machine-type=n2-standard-4provides the recommended 4 vCPUs and 16 GiB RAM. For evaluation or testing, a smaller machine type is fine. -
--imageand--image-projectreference the Plakar Control Plane image by name, which works regardless of whitelisting. -
--create-diskprovisions the 1 TB data disk that holds the database, logs, and all Plakar state, separate from wherever you configure backups themselves -
--service-accountand--scopesattach a service account to the instance, which lets Plakar Control Plane authenticate to Google Cloud services such as inventories and secret providers without a service account key. Both flags are optional if you plan to use service account keys instead. When attaching a service account,--scopes=cloud-platformis required: without it, the instance uses the default access scopes, which block some APIs regardless of the service account’s IAM roles. See Attaching the Service Account to an Instance. to be stored. For evaluation or testing, a smaller size is fine. -
--tags=http-serverapplies the tag GCP’s default network firewall rule uses to allow inbound HTTP traffic. If your project doesn’t have that default rule, create one explicitly:gcloud compute firewall-rules create allow-http \ --network=<NETWORK> \ --allow=tcp:80 \ --target-tags=http-server \ --source-ranges=0.0.0.0/0WarningRestrict
--source-rangesto trusted IP ranges, your organization’s gateway, or a VPN in production.0.0.0.0/0allows access from any address and should only be used for testing or temporary deployments. -
To use Spot provisioning instead of Standard, add
--provisioning-model=SPOT. Spot instances run until preempted by GCP, which makes them a fit for fault-tolerant workloads but not for a Control Plane instance, which needs to run continuously.
Once the instance is created, it can be viewed and managed from Compute Engine → VM instances in the Console like any other instance.
Note
This path requires your Google account or domain to already be whitelisted on
the plakar-images project. If it isn’t, use the CLI tab instead, or
contact us to request access.
Compute instances can be created from Compute Engine → VM instances then click on Create Instance to create a new instance.
Machine configuration
Provide the instance a name, and choose the region and zone where it should run. You then need to select an instance type for running control plane on.
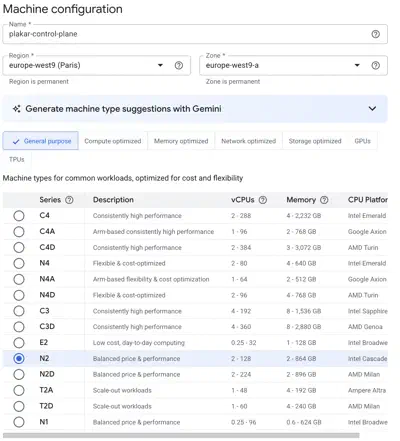
Plakar Control Plane requires the following recommended setup:
- 4 vCPUs
- 16 GiB RAM
- 1 TB of additional storage, on top of the boot disk
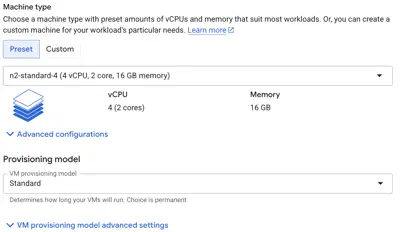
These are recommendations for a production deployment. For evaluation or
testing, a smaller machine type is fine. A preset such as n2-standard-4
satisfies the CPU and RAM requirement.
Under Provisioning model, choose Standard for a persistent deployment. Spot VMs run until preempted by GCP, which makes them a fit for fault-tolerant workloads but not for a Control Plane instance, which needs to run continuously.
OS and storage
By default, GCP proposes a generic Debian image. This needs to be replaced with the Plakar Control Plane image:
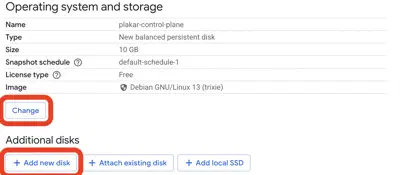
- Under Boot disk, click Change.
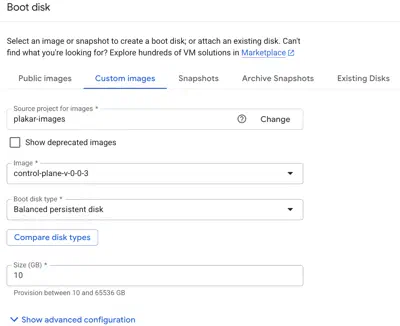
- Select the Custom images tab.
- Under Source project for image, click Change, and select
plakar-imagesfrom the list of projects your account has been granted access to. If the project doesn’t appear here, your account hasn’t been whitelisted yet. See getting access to the image above. - Select the latest available image (currently
control-plane-v-0-0-3).
For the boot disk itself, any of the available persistent disk types (Balanced, SSD, Extreme, or Standard) will work; a size of 10 GB is enough, since the appliance’s actual state is stored on a separate data disk.
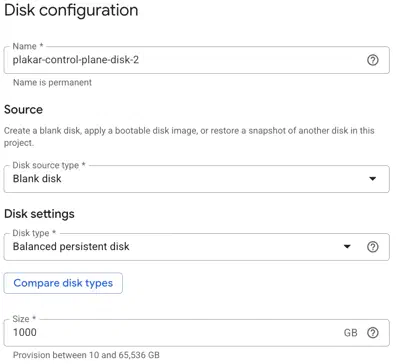
Additional disk
The database, logs, and all Plakar state are stored on a dedicated data disk, separate from wherever you configure backups to be stored:
- Under Additional disks, click Add new disk.
- Leave the disk source blank so GCP creates a new, empty disk.
- Set the size to 1024 GB.
- Choose a disk type. Balanced, SSD, Extreme, Standard, and Hyperdisk are all supported; pick whichever matches your performance and cost requirements.
The remaining disk settings (snapshot schedule and deletion behavior) can be left at their defaults.
Data protection
Choose the snapshot or backup schedule that matches your organization’s data protection requirements for this instance.
Networking
Plakar Control Plane is served through a web UI over HTTP. For HTTPS, place a load balancer in front of the instance to handle TLS termination. Configure firewall rules, network tags, and IP settings according to your organization’s network policy. At minimum, Allow HTTP traffic needs to be enabled for the web UI to be reachable once the instance is running.
Security
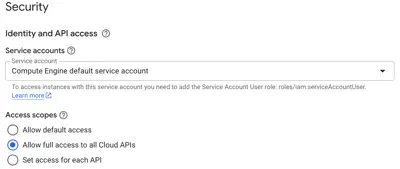
To let Plakar Control Plane authenticate to Google Cloud services without a service account key, select the service account under Identity and API access, and set access scopes to allow full access to all Cloud APIs. The default access scopes block some APIs regardless of the service account’s IAM roles. See Attaching the Service Account to an Instance. This is optional if you plan to use service account keys instead.
Full access only allows the instance to reach Google Cloud APIs. It does not grant any permissions: what the instance can actually do is still determined by the IAM roles assigned to its service account.
The Observability and Advanced tabs can be configured according to your organization’s standards, as neither is required for a working deployment.
Click Create once the configuration is complete.
Accessing Plakar Control Plane
Once the instance is running and reachable, open it from a browser using its assigned external IP address:
http://<EXTERNAL-IP>
For new installations, you will be guided through the enrollment process to:
- Register the instance with Plakar services for licensing and billing
- Create the initial administrator account
See the enrollment documentation for more details.
Limitations
The Google Cloud image does not yet support two capabilities available on the other platforms.
-
SSH access: The instance cannot be reached over SSH. It is administered entirely through the web interface, so plan for the appliance to be managed that way.
-
Proxy and registry mirror configuration: Other platforms accept an HTTP proxy and a Harbor registry mirror through cloud-init user data. The Google Cloud image does not read that configuration, so the instance needs direct outbound access to:
*.plakar.io, for runtime configuration, license validation, and plugin downloads.*.docker.io,*.docker.com,*.ghcr.io, and*.githubusercontent.com, for the container images the appliance runs.
Without that access, the instance cannot validate its license or pull the images it needs to start.