VMware vSphere Installation
Plakar Control Plane can be deployed on vCenter using the vSphere HTML Client. Two deployment methods are supported:
- OVA: imports a pre-built appliance with the recommended virtual machine configuration already defined, including CPU and memory settings
- ISO: creates a virtual machine manually and boot from the Plakar Control Plane ISO image, requiring the virtual machine configuration to be done manually
Both images can be downloaded from the Plakar Control Plane Downloads Page.
Creating the Virtual Machine
In the vSphere HTML Client, open Hosts and Clusters (first column on the sidebar), right-click the datacenter that will contain the appliance, and select Deploy OVF Template.
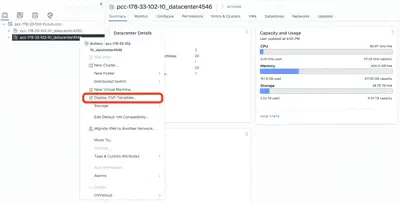
Select an OVF template
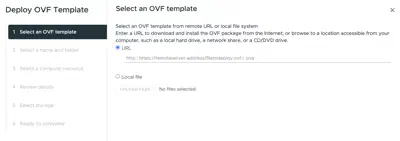
The deployment wizard supports both a local file upload and a remote HTTP or HTTPS URL. For most deployments, choose Local file and upload the Plakar OVA from your workstation.
Warning
URL-based imports are more sensitive to reachability and URL format than a direct upload. If you use the URL option, the OVA must be hosted at a stable, directly reachable HTTP or HTTPS URL that the VMware infrastructure can fetch. For a standalone installation, a local file upload is the more predictable path.
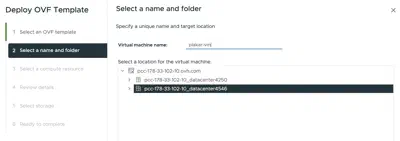
Specify a name and target location
Enter a name for the virtual machine and select the datacenter as the target location.
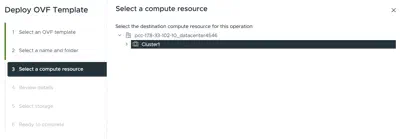
Select a compute resource
Select the destination compute resource for the datacenter. This will typically
be your cluster, for example Cluster1.
Review details
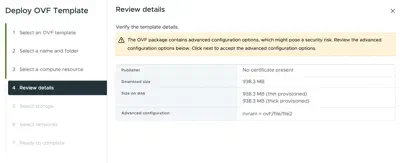
The wizard displays package metadata for the OVA. It is normal for vSphere to warn that the OVF package contains advanced configuration options. VMware documents that these settings can include BIOS UUID information, MAC addresses, boot order, and PCI slot numbers. If the OVA was downloaded from the Plakar downloads page, this warning is expected and can be dismissed by clicking Next.
Select storage
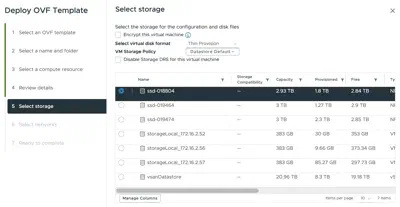
Select the datastore that will hold the virtual machine configuration and disk files.
Note
Avoid selecting a host-local datastore such as storageLocal for production
deployments. A host failure will leave the virtual machine unable to restart
if its disk files are on local storage that is not accessible to other hosts
in the cluster.
Select networks
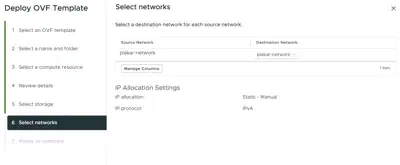
Map the source network to the destination network segment you have prepared in
your vCenter environment. If your environment uses an NSX-backed network
segment, select it as the destination network, for example plakar-network.
Ready to complete
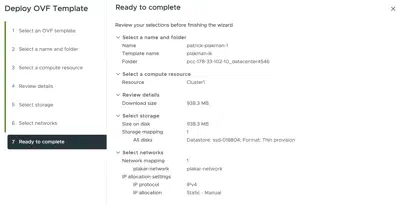
Review your selections and click Finish. You can monitor the import progress from Recent Tasks until the virtual machine appears in the inventory.
The ISO installation method creates a new virtual machine manually and boots it from the Plakar Control Plane ISO image. This method is used when you want to configure the virtual machine hardware yourself instead of importing the pre-built OVA appliance.
Upload the ISO to a datastore
Before creating the virtual machine, upload the Plakar Control Plane ISO to a datastore that can be accessed by the host or cluster that will run the appliance.
In the vSphere HTML Client, open the datastore where you want to store the ISO, then open the Files view. Create a folder for ISO images if needed, then upload the Plakar Control Plane ISO from your workstation.
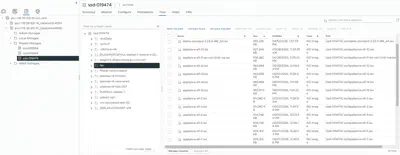
Note
Prefer a shared datastore for ISO images and production virtual machines. Keeping the ISO or the virtual machine disk files on host-local storage can cause access issues when the VM needs to run on another host.
Create a new virtual machine
In the vSphere HTML Client, open Hosts and Clusters (first column on the sidebar), right-click the datacenter that will contain the appliance, and select New Virtual Machine.
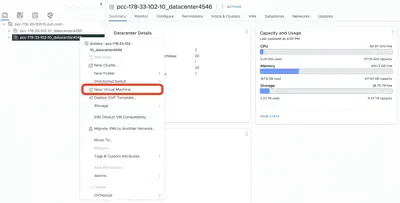
Select a creation type
Select Create a new virtual machine and click Next.
Specify a name and target location
Enter a name for the virtual machine and select the datacenter as the target location.
Select a compute resource
Select the destination compute resource for the datacenter. This will typically
be your cluster, for example Cluster1.
Select storage
Select the datastore that will hold the virtual machine configuration and disk files.
Note
Avoid selecting a host-local datastore such as storageLocal for production
deployments. A host failure will leave the virtual machine unable to restart
if its disk files are on local storage that is not accessible to other hosts
in the cluster.
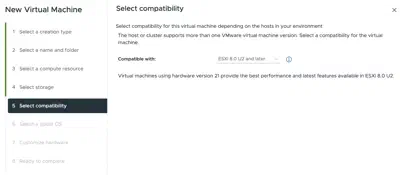
Select compatibility
The compatibility setting determines the virtual hardware version available to the virtual machine. Leave this at the default, ESXi 8.0 U2 and later (hardware version 21), which provides the best performance and access to the latest features supported by your vCenter environment. Click Next.
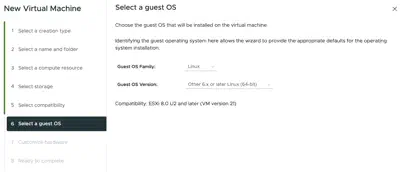
Select a guest OS
Set the guest OS family to Linux, then select the closest modern 64-bit Linux profile available in your vCenter. On many vSphere 8 environments, this option is Other 6.x or later Linux (64-bit). Click Next.
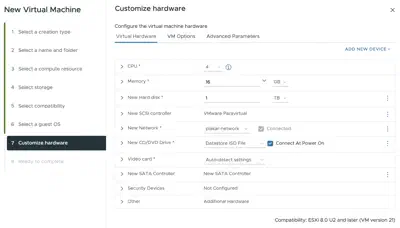
Customize hardware
Configure the virtual machine with the recommended Plakar Control Plane sizing:
- CPU: 4vCPU
- Memory: 16 GB
- Hard disk: 1 TB
These are recommendations for a production deployment. For evaluation or testing, you can reduce CPU, RAM, and storage. The data disk stores the database, logs, and all Plakar state. Backups themselves are stored wherever you configure using apps.
For the CD/DVD Drive, select Datastore ISO File, then browse to the Plakar Control Plane ISO that you uploaded earlier. Enable Connect At Power On so that the virtual machine boots from the ISO when it starts.
Attach the network adapter to the network segment you prepared for the
appliance, such as your NSX-backed segment or another destination network in
your vCenter environment. Select Browse then select your network, for
example plakar-network.
Other hardware settings can be left at their default values.
Add the data disk
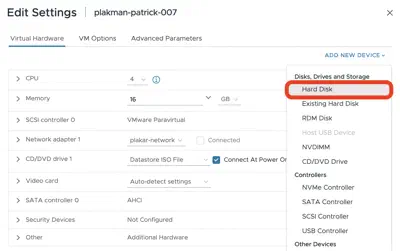
On the ISO path, the recommended 1 TB storage is already configured during virtual machine creation, so this step is OVA-only. Before first power-on, right-click the VM, select Edit settings, open the Virtual Hardware tab, click Add New Device, select Hard Disk, and set it to 1 TB.
Configuring the Appliance
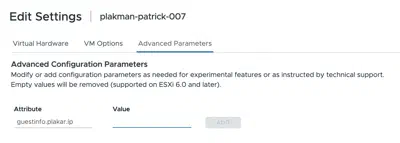
By default the appliance boots with DHCP networking and no SSH access. If that’s enough for you, skip ahead to Start the appliance and complete enrollment. Otherwise, every other setting (static IP, proxy, registry mirror, SSH key) is delivered through vSphere’s guest info mechanism, added under Advanced Parameters before first power-on, or during the Deploy-OVF wizard’s Customize Template step on the OVA path. Pick one of the two tabs below.
What needs to be reachable
Plakar Control Plane requires HTTPS access to api.plakar.io for runtime
configuration, license validation, and plugin downloads. If your proxy uses a
whitelist instead of allowing all outbound traffic, add *.plakar.io.
The appliance also needs to pull container images from docker.io and
ghcr.io. There are two supported approaches:
- Route image pulls through the HTTP proxy. If you choose this option, the
proxy should allow access to:
*.docker.io*.docker.com*.ghcr.io*.githubusercontent.com
- Use a Harbor registry mirror. This is the recommended approach for production deployments because images are pulled from a local registry cache instead of the public internet. When using Harbor, you don’t need to whitelist the Docker and GitHub domains above on your proxy.
For a single NIC and straightforward settings, every option is its own
guestinfo.plakar.* parameter, no YAML required.
For a static IP, set guestinfo.plakar.ip, guestinfo.plakar.gateway, and
guestinfo.plakar.dns together: all three are required for this channel to take
effect. The proxy, registry, and SSH parameters below are independent of the
network ones and of each other, so add only the ones you actually need.
| Parameter | Description |
|---|---|
guestinfo.plakar.ip |
Appliance IP address with CIDR mask |
guestinfo.plakar.gateway |
Network gateway for the selected segment |
guestinfo.plakar.dns |
DNS resolver used by the appliance, e.g. 1.1.1.1 |
guestinfo.plakar.http_proxy |
HTTP proxy URL |
guestinfo.plakar.https_proxy |
HTTPS proxy URL (defaults to the HTTP proxy if omitted) |
guestinfo.plakar.no_proxy |
Comma-separated bypass list |
guestinfo.plakar.registry_mirrors |
Comma-separated upstream=prefix pairs |
guestinfo.plakar.registry_insecure |
true to skip TLS verification for the mirror hosts |
guestinfo.plakar.ssh_authorized_keys |
Contents of your SSH public key |
The gateway can usually be found from the NSX network segment configuration.
For multiple NICs, static routes, or to bundle every setting into one document,
use guestinfo.userdata instead of the flat keys.
Cloud-init via guestinfo.userdata (proxy, registry, network, SSH)
A single cloud-config document can carry proxy:, registry:, network:, and
ssh_authorized_keys: together, so include only the keys you need:
#cloud-config
proxy:
  http: http://<proxy-ip>:<proxy-port>
  https: http://<proxy-ip>:<proxy-port>
  no_proxy: .corp.example,10.0.0.0/8 # optional

registry:
  mirrors:
    docker.io: <harbor-host>/dockerhub-proxy
    ghcr.io: <harbor-host>/ghcr-proxy
  insecure: false # true: skip TLS verification for the mirror hosts

network:
  ethernets:
    eth0:
      addresses: [10.0.1.5/24] # CIDR suffix is mandatory
      gateway4: 10.0.1.1
      nameservers:
        addresses: [10.0.1.53, 10.0.1.54]
    eth1:
      addresses: [10.20.0.5/24]
      routes: # reach sources behind a router on this segment
        - to: 10.50.0.0/16
          via: 10.20.0.1
    eth2:
      dhcp4: true

ssh_authorized_keys:
  - ssh-ed25519 AAAA...
The network: key accepts a netplan v2
document, under a top-level network: key or a bare ethernets: key. The
appliance evaluates network sources in order. As soon as one source successfully
defines at least one network interface, it is used and all remaining sources are
ignored.
- An OVF property set during the Deploy-OVF wizard’s Customize Template step, if the deployed OVA defines one
- The flat
guestinfo.plakar.*keys, from the Basic tab - The
network:key insideguestinfo.userdata, above - DHCP fallback
Only a subset of netplan is supported: addresses (first entry, CIDR required),
gateway4, routes ({to, via}, with to: default as an alias for
gateway4), nameservers.addresses, dhcp4: true, and match.macaddress to
select a NIC by MAC address instead of its kernel name. A MAC match survives
adapter reordering, unlike the PCI-order eth0/eth1 kernel names:
backup-a:
  match: { macaddress: "00:50:56:aa:bb:cc" }
  addresses: [10.20.0.5/24]
For VMware, we recommend the equivalent single-line YAML format instead: the
guestinfo.userdata field is single-line, so line breaks are removed when the
value is entered, and the compact form is easier to copy and paste:
{ proxy: { http: "http://<proxy-ip>:<proxy-port>", https: "http://<proxy-ip>:<proxy-port>", no_proxy: ".corp.example,10.0.0.0/8" }, registry: { mirrors: { docker.io: "<harbor-host>/dockerhub-proxy", ghcr.io: "<harbor-host>/ghcr-proxy" }, insecure: false } }| Parameter | Description |
|---|---|
guestinfo.userdata |
Cloud-init document containing any of the keys shown above |
Alternatively, the OVF property plakar.userdata can carry the same document,
base64-encoded, via the Deploy-OVF wizard’s Customize Template step, instead of
Advanced Parameters.
Connect over SSH
If you configured an SSH key, connect to the booted appliance with the plakar
user:
ssh plakar@<ASSIGNED-IP>Replace <ASSIGNED-IP> with the appliance’s configured or DHCP-assigned IP
address.
Start the appliance and complete enrollment
Power on the virtual machine. Once the appliance has booted and is reachable on the network, open it from a browser using its assigned IP address.
http://<ASSIGNED-IP>For production environments, restrict access to trusted IP ranges, private networking, a VPN, or a reverse proxy or load balancer with TLS.
For first-time installations, you will be guided through the enrollment process to:
- Register the instance with Plakar services for licensing and billing
- Create the initial administrator account
See the enrollment documentation for more details.