Exoscale Installation
Plakar Control Plane is distributed for Exoscale as a QCOW2 virtual machine image. The official QCOW2 image can be downloaded from:
Unlike marketplace-based deployments such as AWS AMIs, Exoscale instances cannot boot directly from a QCOW2 image. Instead, the image must first be registered as a Compute custom template, which can then be used to create instances.
Preparing the QCOW2 image
Exoscale needs a publicly accessible URL to download the QCOW2 image from when creating the custom template, along with its MD5 checksum to verify the image during import. There are two ways to provide this:
- Direct download (recommended): use the download link from the downloads page directly as the image source, together with the MD5 checksum published alongside it. No local download or re-hosting is required.
- Self-hosted: download the QCOW2 image locally, then re-upload it to your
own publicly accessible storage, such as Exoscale’s Simple Object Storage
(SOS). Use this if you want to keep your own copy of the image, or if your
environment can’t reach
plakar.iodirectly when creating the template.
If you choose the self-hosted option, download the image from the downloads page, then confirm it downloaded correctly by comparing its checksum against the one published on the downloads page:
md5sum plakar-control-plane.qcow2
QCOW2 Image URL
Whichever option you choose, the image URL must be publicly accessible. Exoscale downloads the image directly when creating the custom template, so the URL cannot require authentication.
Hosting the QCOW2 image with Exoscale Simple Object Storage
This step is only needed if you’re following the self-hosted option above. If you’re linking directly to the downloads page, skip ahead to Creating the custom template.
Open the Storage section in the Exoscale console and create a new Simple Object Storage (SOS) bucket. Choose a zone for the bucket and provide a name. The region does not matter for this purpose.
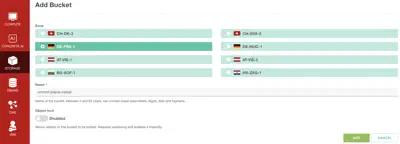
Once the bucket has been created, open it and click Upload object. Upload the QCOW2 image that you downloaded earlier.
After the upload completes, open the uploaded object and navigate to the ACL tab. Click ADD CANNED ACL, then select PUBLIC-READ. This makes the object publicly accessible so Exoscale can download it when creating the custom template.
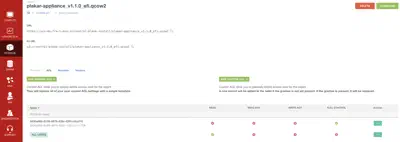
You can then copy the object’s URL and use it when registering the custom template in Exoscale.
Creating the custom template
Open Compute → Templates in the Exoscale console, then click Add custom template.
Provide a name for the template and select the zone where it will be created. The template can only be used to create instances in the same zone, so choose the zone where you intend to deploy Plakar Control Plane.
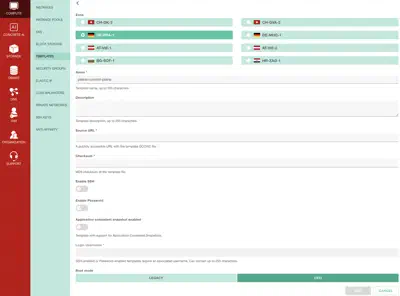
For the image source, provide the public URL of the QCOW2 image, either the direct download link from the downloads page or your SOS object URL then enter the corresponding MD5 checksum. Set the boot mode to UEFI.
If you intend to use Exoscale’s Application Consistent Snapshots, enable Application consistent snapshot when creating the custom template. This option cannot be enabled later unless it is supported by the template.
If you want SSH access to the instance, enable SSH access and set the
Login username to plakar. SSH access is optional and is not required for a
standard installation. Plakar Control Plane is designed to be managed through
the web interface.
Once the template has been configured, click Add to create the template.
SSH Access
SSH-enabled templates require a public SSH key. If SSH access is enabled, you’ll be able to connect to the instance after deployment using:
ssh plakar@<instance-ip-address>Replace <instance-ip-address> with the public IP address assigned to the
instance.
Creating the instance
Open Compute → Instances in the Exoscale console, then click Add instance.
Provide a name for the instance. Under Templates, select Custom template, then choose the template created in the previous step.
Once a custom template has been selected, the instance is automatically created in the same zone as the template. The zone cannot be changed, so ensure the template was created in the zone where you intend to deploy Plakar Control Plane.
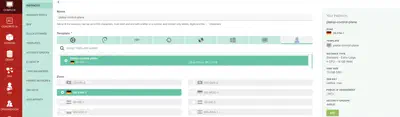
For a production deployment, Plakar Control Plane is recommended to run with:
- 4 vCPUs
- 16 GB RAM
- 1 TB of Block Storage
An Extra Large instance from the Standard instance type family is suitable for most deployments. The template only requires a small boot disk, so a 10 GB system disk is sufficient. Plakar Control Plane stores its database, logs, and application state on a separate Block Storage volume, which will be attached later.
For evaluation or testing, you can reduce the CPU, memory, and storage allocation.
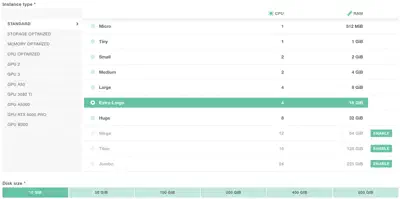
Configure the remaining instance options as needed for your environment.
If your environment requires outbound traffic to pass through a proxy, configure it as described in the Proxy and Harbor Configuration section.
If SSH access was enabled when creating the custom template, select the SSH key pair to authorize for the instance.
Leave Public IP Assignment enabled so the instance receives a public IPv4 address that can be used to access Plakar Control Plane after deployment. If you’re deploying Plakar Control Plane behind a private network, you can disable public IP assignment instead.
You can also assign one or more Security Groups to the instance. This can be configured now or after the instance has been created. The recommended security group configuration is covered in the Security Groups section.
If the custom template was created with Application consistent snapshot support enabled, you can also enable it for the instance. This is optional and only required if you intend to use Exoscale’s application-consistent snapshot feature.
Before creating the instance, disable Auto start. This allows you to attach the additional Block Storage volume before Plakar Control Plane boots for the first time.
Once configured, click Create instance.
Creating the Block Storage volume
Open Compute → Block Storage in the Exoscale console, then click Create Block Storage.
Provide a name for the volume, select the same zone as the instance, and create it as a Blank volume. A recommended size of 1024 GB is suitable for most deployments.
Block Storage volumes can only be attached to instances in the same zone. This volume stores the Plakar Control Plane database, logs, and all application state. Backups themselves are stored wherever you configure using apps.
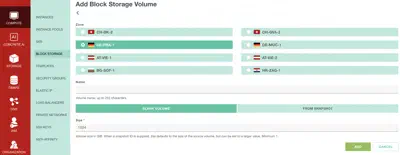
Once the volume has been created, open Compute → Instances and select the Plakar Control Plane instance. Under Block Storage Volumes, click Attach volume, then select the Block Storage volume that you created.

Proxy and Harbor Configuration
If the instance doesn’t have direct internet access, configure an HTTP proxy, a local Harbor registry mirror, or both through the instance’s User data before creating the instance.

What needs to be reachable
Plakar Control Plane requires HTTPS access to api.plakar.io for runtime
configuration, license validation, and plugin downloads. If your proxy uses a
whitelist instead of allowing all outbound traffic, you need to add
*.plakar.io
The appliance also needs to pull container images from docker.io and
ghcr.io. There are two supported approaches:
-
Route image pulls through the HTTP proxy. If you choose this option, the proxy should allow access to:
*.docker.io*.docker.com*.ghcr.io*.githubusercontent.com
-
Use a Harbor registry mirror. This is the recommended approach for production deployments because images are pulled from a local registry cache instead of the public internet. When using Harbor, you don’t need to whitelist the Docker and GitHub domains above on your proxy.
User data configuration
The User data is a standard cloud-init YAML document containing proxy: and/or
registry: sections, depending on your environment.
#cloud-config
proxy:
  http: http://<proxy-ip>:<proxy-port>
  https: http://<proxy-ip>:<proxy-port>
  no_proxy: .corp.example,10.0.0.0/8 # optional

registry:
  mirrors:
    docker.io: <harbor-host>/dockerhub-proxy
    ghcr.io: <harbor-host>/ghcr-proxy
  insecure: false # true: skip TLS verification for the mirror hosts
Security Groups
The networking configuration below is intended for a basic deployment setup.
In production environments, networking and access control should be adapted to match your infrastructure and security requirements. For example:
- Exposing Plakar Control Plane through a load balancer with HTTPS/TLS certificates
- Restricting access through a VPN or private network
- Limiting inbound traffic to trusted IP ranges
- Using internal-only networking
Create a security group that allows inbound TCP traffic on port 80 to access
the Plakar Control Plane web interface. If SSH access was enabled when creating
the custom template, also allow inbound TCP traffic on port 22.
The allowed source can be:
- Your public IP address
- Your organization gateway or VPN address
0.0.0.0/0for temporary testing access
By default, Exoscale allows all outbound traffic, so no additional egress rules are required.
Once the security group has been created, open the Plakar Control Plane instance and navigate to the Security Groups tab. Attach the security group to the instance.
Warning
Using 0.0.0.0/0 allows access from any IP address and should only be used
for testing or temporary deployments.
Starting the instance
After the Block Storage volume has been attached, start the instance from the Exoscale console.
Plakar Control Plane will detect and initialize the attached Block Storage volume during its first boot.
Accessing Plakar Control Plane
After the instance has started, the Block Storage volume has been attached, and the security group has been configured, Plakar Control Plane can be accessed from your browser using:
http://<public-ipv4-address>Where <public-ipv4-address> is the public IPv4 address assigned to the
instance. For first-time installations, you will be guided through the
enrollment process to:
- Register the instance with Plakar services for licensing and billing
- Create the initial administrator account
See the enrollment documentation for more details.